
Oh my goodness, let me tell you about my latest obsession: Baked Caesar Chicken! This dish is a total game changer for busy weeknights when you want something delicious without spending hours in the kitchen. Imagine tender chicken fillets coated in a creamy Caesar dressing, topped with crispy breadcrumbs and nutty Parmesan cheese. Just thinking about it makes my mouth water!
I remember the first time I made this for my family; I had a long day and needed something quick but satisfying. I whipped up this recipe, and as it baked in the oven, the aroma filled our home like a cozy hug. When it finally came out, golden brown and bubbling, we all gathered around the table, and every bite was met with smiles and happy murmurs. It’s packed with flavor, yet it’s surprisingly healthy, making it perfect for those looking to keep things light. Trust me, once you try Baked Caesar Chicken, it’ll become a staple in your home too! It’s not just dinner; it’s a delightful experience that brings everyone together.
Ingredients List
Getting the ingredients ready for Baked Caesar Chicken is super simple, and I bet you’ll love how they all come together for a delicious meal! Here’s what you’ll need:
- 4 chicken fillets, trimmed and patted dry
- 1/2 cup Caesar dressing (I like to use a creamy one for extra flavor!)
- 1/2 cup grated Parmesan cheese (freshly grated is always best if you can swing it!)
- 1 cup breadcrumbs (panko works great for that extra crunch!)
- 1 teaspoon garlic powder (for that irresistible aroma)
- 1 teaspoon black pepper (adjust to your taste if you like a bit more kick!)
Make sure you have everything on hand before you start cooking—trust me, it makes the process so much smoother. Now, let’s get ready to whip up something amazing!
How to Prepare Baked Caesar Chicken
Alright, let’s dive into the step-by-step magic of preparing your Baked Caesar Chicken! This process is straightforward and oh-so-rewarding. Just follow along, and you’ll have a delicious dinner ready in no time!
Preheating the Oven
First things first, you need to preheat your oven to 375°F (190°C). I can’t stress how important this step is! Preheating ensures that your chicken starts cooking evenly right from the get-go. When the oven is at the right temperature, it helps the chicken get that crispy, golden coating while keeping the meat juicy and tender inside. So, go ahead and crank that oven up while you get everything else ready!
Preparing the Chicken Fillets
Next, let’s get our chicken fillets ready! In a medium bowl, combine the 1/2 cup of Caesar dressing with 1 teaspoon of garlic powder and 1 teaspoon of black pepper. Give it a good stir until it’s all mixed together. Now, grab those chicken fillets and coat them evenly with this flavorful dressing mixture. I like to use my hands for this part; it feels more personal, and it helps to really cover every inch of the chicken. Just make sure your hands are clean, of course!
Combining Breadcrumbs and Cheese
Now, onto the breadcrumb topping! In another bowl, mix together 1 cup of breadcrumbs and 1/2 cup of grated Parmesan cheese. You want to get it combined well so that every bite has that delicious cheesy crunch. If you prefer a little extra flavor, you can even add a dash of Italian seasoning here! It’s all about finding what you love. Once it’s mixed, it should have a nice crumbly texture that will create the perfect crust when baked.
Baking the Chicken
Time to bake! Take your coated chicken fillets and place them in a baking dish. I like to line the dish with a little cooking spray or olive oil to make sure they don’t stick. Now, sprinkle that breadcrumb and cheese mixture generously over each fillet, pressing down gently to make sure it sticks. This gives you that beautiful crispy topping! Pop the dish into the preheated oven and bake for about 25-30 minutes. You’ll know it’s done when the chicken reaches an internal temperature of 165°F (75°C) and the topping is golden brown. If you want to be extra sure, you can use a meat thermometer!
Resting the Chicken
Once your chicken is out of the oven and looking fabulous, resist the urge to dive right in! Let it rest for about 5 minutes before serving. This step is crucial because it allows the juices to redistribute throughout the chicken, making it even more flavorful and juicy. Trust me, that little wait is worth it!
Nutritional Information Disclaimer
Before you get too excited about digging into your Baked Caesar Chicken, it’s important to note that nutritional values can vary based on the specific ingredients and brands you use. While I’ve provided some general information, the actual nutrition data might not match perfectly with what you see here. So, if you’re tracking calories or specific dietary needs, I recommend checking the labels on the products you choose. It’s always a good idea to customize your meals to fit your tastes and health goals! Enjoy your cooking adventure, and remember, a little flexibility can go a long way in the kitchen!
Why You’ll Love This Recipe
- Quick Preparation: You can whip this up in just 15 minutes, making it perfect for those busy weeknights when you need a delicious meal in a hurry!
- Flavorful Taste: The combination of creamy Caesar dressing, zesty garlic, and cheesy breadcrumbs creates a mouthwatering flavor that everyone will love.
- Healthy Option: With lean chicken fillets and the ability to customize the ingredients, this dish is a guilt-free choice that fits perfectly into a balanced diet.
- Family-Friendly: Even the pickiest eaters will enjoy this dish! It’s a great way to introduce them to new flavors while keeping it familiar.
- Versatile: Pair it with a fresh salad, roasted veggies, or whatever sides you love to make it your own!
Tips for Success
Now that you’re all set to make your Baked Caesar Chicken, here are some tried-and-true tips to ensure you nail it every single time! Trust me, these little nuggets of wisdom can make a world of difference in the kitchen.
Choose Quality Ingredients
First and foremost, go for the best ingredients you can find. Fresh chicken fillets make all the difference in flavor and texture. If you can, buy organic or free-range chicken. And when it comes to the Caesar dressing, don’t skimp! A good quality dressing can elevate the entire dish. Look for one that’s rich and creamy, with a flavor that makes your taste buds sing!
Adjust Seasoning to Taste
Don’t be afraid to play around with the seasonings! If you love garlic, add a bit more garlic powder to the dressing. Prefer a kick? Toss in a pinch of red pepper flakes or some Italian herbs into the breadcrumb mixture. Remember, cooking is all about personalizing the flavors to suit your taste, and you can always adjust as you go!
Don’t Overcrowd the Baking Dish
When you arrange the chicken in your baking dish, give each fillet a bit of space. Overcrowding can lead to uneven cooking and soggy breadcrumbs. If you’re making a larger batch, consider using two dishes or baking in batches. You want each piece to get that lovely, crispy exterior!
Keep an Eye on the Baking Time
Every oven is a bit different, so keep an eye on your chicken as it bakes. Start checking for doneness around the 25-minute mark. If the breadcrumbs are already golden brown but the chicken isn’t quite done, you can loosely cover it with foil to prevent burning while it finishes cooking. Remember, the chicken should reach an internal temperature of 165°F (75°C) for safety.
Let It Rest
Oh, and don’t skip the resting time! I know it’s tempting to serve it right away, but letting the chicken rest for about 5 minutes allows the juices to redistribute, making every bite incredibly juicy. You’ll thank me later!
So, gather your ingredients, follow these tips, and enjoy the satisfaction of making a delicious Baked Caesar Chicken that’s sure to impress your family and friends. Happy cooking!
Variations of Baked Caesar Chicken
One of the best things about Baked Caesar Chicken is how adaptable it is! There are so many fun ways to put your own twist on this dish, and I can’t wait to share some of my favorite variations with you. Whether you want to change the cheese, add some veggies, or spice things up, the possibilities are endless!
Cheese Swaps
While Parmesan cheese is a classic choice, you can experiment with different cheeses to suit your taste. For a creamier texture, try mozzarella or provolone. If you’re in the mood for something a bit sharper, crumbled feta or aged cheddar can add a whole new flavor dimension. You can even mix a couple of cheeses together for a delightful cheesy topping!
Adding Vegetables
Vegetables are a fantastic way to boost nutrition and flavor! Think about adding some sliced bell peppers, zucchini, or cherry tomatoes on the side before baking. You can even place the veggies in the baking dish with the chicken, allowing them to soak up all those delicious Caesar flavors. Plus, it makes for a beautiful presentation!
Spice it Up
If you’re a fan of heat, why not kick things up a notch? A pinch of red pepper flakes or a dash of hot sauce in the dressing can add a spicy kick that complements the creamy Caesar dressing perfectly. You can also experiment with different herbs like oregano or thyme for an extra layer of flavor.
Going Low-Carb
For those looking to keep it low-carb, you can ditch the breadcrumbs altogether! Instead, try using crushed pork rinds or finely chopped nuts for a crispy topping. They add great texture and flavor without the carbs. Just be sure to adjust the cooking time slightly, as these alternatives may cook faster.
Herb Infusions
Another fun twist is to infuse fresh herbs into the dish. Chopped parsley, basil, or dill can brighten up the flavors of your Baked Caesar Chicken. Mix them into the dressing or sprinkle them on top before serving for a fresh pop of color and taste.
With these variations, you can keep your Baked Caesar Chicken exciting and tailored to your preferences. So go ahead, get creative in the kitchen, and make it your own! I promise you won’t be disappointed—every version is bound to be delicious!
Serving Suggestions
Now that you’ve got your Baked Caesar Chicken all ready to go, let’s talk about what to serve alongside it to really elevate your meal! The right sides can make a big difference, turning a delicious dinner into a memorable feast. Here are some of my favorite pairings that complement the flavors of the chicken beautifully:
- Fresh Caesar Salad: You can’t go wrong with a classic! A crisp Caesar salad with romaine lettuce, croutons, and a sprinkle of extra Parmesan will mirror those delicious Caesar flavors. Drizzle a little Caesar dressing on top for that extra zing!
- Roasted Vegetables: Toss a mix of your favorite veggies like broccoli, bell peppers, and carrots in olive oil, salt, and pepper. Roast them in the oven until they’re tender and slightly caramelized. They add a lovely touch of color and nutrition to your plate!
- Garlic Bread: Who doesn’t love a slice of warm, buttery garlic bread? It’s perfect for soaking up any extra dressing from the chicken. Plus, it’s a crowd-pleaser that everyone will enjoy.
- Quinoa or Brown Rice: For a wholesome side, serve your chicken with fluffy quinoa or brown rice. You can even mix in some herbs or a squeeze of lemon for added flavor. It’s a great way to keep the meal light and healthy!
- Steamed Asparagus: Lightly steamed asparagus drizzled with a bit of lemon juice can add a fresh, vibrant touch to your meal. The crunchiness pairs well with the crispy chicken!
Feel free to mix and match these suggestions based on what you have on hand or what your family loves most. The beauty of this Baked Caesar Chicken is that it’s versatile, and you can create a complete, satisfying meal that everyone will rave about!
Storage & Reheating Instructions
So, you’ve made a delicious batch of Baked Caesar Chicken, and now you have some leftovers? No problem! Proper storage and reheating will ensure you can enjoy those tasty flavors again. Here’s how to keep your chicken fresh and delicious for your next meal.
Storing Leftover Baked Caesar Chicken
To store your leftover Baked Caesar Chicken, let it cool to room temperature first. I know it’s tempting to toss it in the fridge right away, but letting it cool helps prevent condensation that can make your chicken soggy. Once it’s cooled, transfer the chicken to an airtight container. If you have a lot left, you can also wrap individual portions tightly in plastic wrap or foil. This way, you can grab just what you need for a quick meal later!
Leftover Baked Caesar Chicken will stay fresh in the refrigerator for about 3-4 days. If you want to keep it longer, consider freezing it. Just make sure to use a freezer-safe container or heavy-duty freezer bags. It should be good for about 2-3 months in the freezer. Just label the containers with the date so you can keep track!
Reheating Your Chicken
When you’re ready to enjoy your leftovers, reheating them properly is key to maintaining that scrumptious flavor and texture. The best way to reheat Baked Caesar Chicken is in the oven. Preheat your oven to 350°F (175°C) and place the chicken in a baking dish. Cover it loosely with foil to prevent the breadcrumbs from burning. Heat for about 15-20 minutes, or until the chicken is warmed through. This method helps keep the chicken juicy while giving the breadcrumbs a nice crisp again!
If you’re in a hurry, you can also reheat it in the microwave. Just pop it on a microwave-safe plate and cover it with a damp paper towel to keep the moisture in. Heat on medium power in 30-second intervals until warmed through. Just be cautious not to overdo it, or the chicken might turn rubbery!
And remember, whether you’re reheating in the oven or microwave, always check that the chicken is heated to at least 165°F (75°C) to ensure it’s safe to eat. With these simple storage and reheating tips, you’ll be able to savor the delightful taste of Baked Caesar Chicken even after it’s left the oven!
Print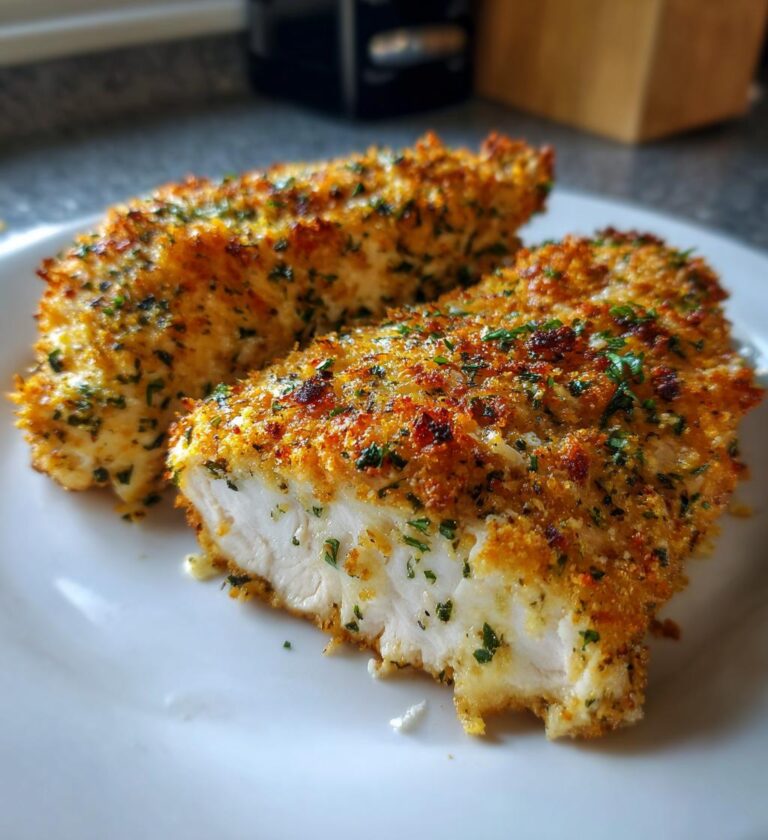
Baked Caesar Chicken: 5 Ways to Elevate Dinner Delight
A delicious baked chicken dish with Caesar flavors.
- Total Time: 45 minutes
- Yield: 4 servings 1x
Ingredients
- 4 chicken fillets
- 1/2 cup Caesar dressing
- 1/2 cup grated Parmesan cheese
- 1 cup breadcrumbs
- 1 teaspoon garlic powder
- 1 teaspoon black pepper
Instructions
- Preheat the oven to 375°F (190°C).
- In a bowl, mix Caesar dressing, garlic powder, and black pepper.
- Coat chicken fillets with the dressing mixture.
- In another bowl, combine breadcrumbs and Parmesan cheese.
- Press the breadcrumb mixture onto the chicken fillets.
- Place chicken in a baking dish and bake for 25-30 minutes or until cooked through.
- Let it rest for 5 minutes before serving.
Notes
- Adjust seasoning to your taste.
- Serve with a side salad for a complete meal.
- Prep Time: 15 minutes
- Cook Time: 30 minutes
- Category: Main Course
- Method: Baking
- Cuisine: American
- Diet: Low Calorie
Nutrition
- Serving Size: 1 chicken fillet
- Calories: 350
- Sugar: 1g
- Sodium: 800mg
- Fat: 20g
- Saturated Fat: 5g
- Unsaturated Fat: 10g
- Trans Fat: 0g
- Carbohydrates: 15g
- Fiber: 1g
- Protein: 30g
- Cholesterol: 100mg
Keywords: Baked Caesar Chicken, Chicken Recipe, Easy Dinner