
Oh my goodness, let me tell you about chicken katsu! This dish is pure joy on a plate. Imagine biting into a crispy, golden-brown chicken cutlet that practically crunches with every bite, revealing tender, juicy chicken inside. And the best part? It’s drizzled with that savory tonkatsu sauce that adds a delightful sweetness and tang. Just thinking about it makes my mouth water!
This chicken katsu recipe has become a go-to in my kitchen, and for good reason. I remember the first time I made it; I was a bit nervous, but as soon as that chicken started sizzling in the pan, I knew I was onto something special. The whole family fell in love with it, and now it’s a staple for quick weeknight dinners or even special occasions. I love how versatile it is too! You can serve it with rice, salad, or even just a simple dipping sauce. Trust me, once you try making chicken katsu at home, you’ll understand why it has a permanent spot in my heart (and my recipe book)!
Ingredients List
Gathering these ingredients is the first step to creating your delicious chicken katsu! Here’s what you’ll need:
- 2 chicken fillets
- 1 cup panko breadcrumbs
- 1/2 cup all-purpose flour
- 2 eggs
- 1/2 cup vegetable oil
- Salt to taste
- Pepper to taste
- Tonkatsu sauce for serving
Make sure your chicken fillets are nice and fresh for the best flavor. The panko breadcrumbs are key to that irresistible crunch, so don’t skimp on those! You’ll also want to keep salt and pepper handy for seasoning – they really bring out the chicken’s taste. Once you have everything ready, you’ll be all set to create this mouthwatering dish!
How to Prepare Chicken Katsu
Alright, let’s get cooking! Preparing chicken katsu is a fun and straightforward process. Follow these steps to create that perfect crispy cutlet:
- Pound the Chicken: Start by placing your chicken fillets between two sheets of plastic wrap or parchment paper. Grab a meat mallet or rolling pin and gently pound the chicken to an even thickness, about half an inch. This ensures they cook evenly and stay juicy!
- Season: Sprinkle both sides of the chicken with salt and pepper. Don’t be shy; this is where the flavor begins!
- Set Up Your Breading Station: Get three shallow bowls ready. In the first bowl, add the all-purpose flour. In the second, crack and beat the eggs until smooth. And in the third bowl, pour in the panko breadcrumbs. This setup makes the breading process super easy!
- Breading Time: Take one chicken fillet and dredge it in the flour, shaking off any excess. Next, dip it into the beaten eggs, allowing any extra to drip off. Finally, coat the chicken in the panko breadcrumbs, pressing gently to ensure they stick. Repeat this for the second fillet. You want that crunchy exterior, so make sure each piece is well coated!
- Heat the Oil: In a large skillet, heat the vegetable oil over medium heat. You want enough oil to cover the bottom of the pan and create a nice frying environment. It should shimmer but not smoke!
- Fry the Chicken: Carefully place the breaded chicken fillets in the hot oil. Fry them for about 4-5 minutes on each side, or until they’re golden brown and cooked through. The crispy sound will be music to your ears! Use a spatula to flip them gently.
- Drain: Once cooked, transfer the chicken to a plate lined with paper towels to absorb any excess oil. This step keeps your katsu nice and crispy!
- Slice and Serve: After a minute of resting, slice the chicken katsu into strips and serve it warm with a generous drizzle of tonkatsu sauce. You can also pair it with rice and a side of shredded cabbage for a complete meal!
And there you have it! You’re just a few simple steps away from enjoying your homemade chicken katsu. Trust me, your taste buds are in for a treat!
Why You’ll Love This Recipe
This chicken katsu recipe has so much going for it! Here are just a few reasons why you’ll fall head over heels for this dish:
- Quick Preparation: With just 25 minutes from start to finish, you can whip up a delicious meal even on the busiest weeknights!
- Delicious Flavor: The crispy, golden crust combined with the juicy chicken and savory tonkatsu sauce creates a flavor explosion that’s hard to resist.
- Versatile Serving Options: Pair it with rice, a fresh salad, or even serve it as a sandwich! Chicken katsu adapts beautifully to whatever you’re in the mood for.
- Kid-Friendly: It’s a hit with kids and adults alike! The crunchiness and dip-able sauce make it a fun meal for the whole family.
- Perfect for Meal Prep: Make extra and enjoy it for lunch the next day! It tastes great cold or reheated, making it a fantastic option for meal prepping.
Honestly, once you give this chicken katsu a try, you’ll understand why it quickly becomes a favorite in your home too!
Tips for Success
Now that you’re ready to make your chicken katsu, here are some pro tips to ensure it turns out perfectly every single time. Trust me, these little tricks can make all the difference!
- Frying Temperature: Make sure your oil is at the right temperature before adding the chicken. If it’s too cool, the chicken will absorb oil and become greasy. You’re aiming for around 350°F (175°C). A simple way to test if the oil is ready is to drop a few breadcrumbs in – if they sizzle and rise to the surface, you’re good to go!
- Don’t Overcrowd the Pan: Fry the chicken in batches if needed. Overcrowding lowers the oil temperature, which can lead to soggy katsu instead of that glorious crunch we’re after. Give each piece some space to fry evenly and get that gorgeous golden color.
- Perfect Breading: When breading the chicken, be sure to press the panko breadcrumbs onto the chicken firmly to help them stick. This ensures a thicker, crunchier crust that won’t fall off during cooking!
- Resting Time: After frying, let the chicken rest on a paper towel-lined plate. This step is vital as it allows some excess oil to drain off, keeping your katsu crispy. Also, it gives the juices a moment to redistribute, making each bite extra juicy!
- Watch the Time: Keep an eye on your frying time! Depending on the thickness of your chicken fillets, the cooking time may vary. If you’re unsure, use a meat thermometer to check for doneness; the internal temperature should reach 165°F (75°C).
- Experiment with Flavors: Feel free to add a bit of garlic powder or paprika to your flour or panko breadcrumbs for an extra layer of flavor! Just a pinch can elevate your chicken katsu to new heights.
Following these tips will help you create chicken katsu that’s not just good, but absolutely fantastic! You’re going to impress everyone with your culinary skills, and I can’t wait for you to enjoy every crunchy, savory bite!
Serving Suggestions
Now that you’ve prepared your scrumptious chicken katsu, let’s talk about how to elevate your meal with some delightful accompaniments. This dish is incredibly versatile, and the right sides can truly enhance your dining experience!
- Steamed Rice: A classic pairing! Serve the chicken katsu over a bed of fluffy white rice or even sticky rice. The rice soaks up the delicious tonkatsu sauce, making each bite a little taste of heaven!
- Shredded Cabbage: A simple side of shredded cabbage adds a refreshing crunch that balances the richness of the fried chicken. You can toss it with a light vinaigrette or just serve it plain for a fresh contrast.
- Japanese Potato Salad: Creamy and slightly sweet, this potato salad is a fantastic complement to the savory katsu. It’s a comforting side that brings a bit of homey warmth to your meal.
- Miso Soup: For a complete Japanese-inspired meal, whip up a quick bowl of miso soup. The umami flavors of the soup pair beautifully with the crispy chicken, creating a satisfying dining experience.
- Pickled Vegetables: Adding some pickled veggies offers a tangy contrast that cuts through the richness of the katsu. A small side of pickled daikon or cucumber can brighten up your plate!
- Dipping Sauces: While tonkatsu sauce is a must, don’t hesitate to offer additional dipping sauces on the side. A little spicy mayo or even a citrusy ponzu sauce can take your chicken katsu to the next level!
Mix and match these suggestions according to your mood or what you have on hand! Each side dish brings its own charm to the table, making your chicken katsu meal a delightful experience every time. Enjoy your culinary adventure!
Nutritional Information
Understanding the nutritional value of your homemade chicken katsu can help you enjoy it even more! Here’s a breakdown of the estimated nutritional values per serving. Keep in mind that these are approximations and can vary based on the specific ingredients you use:
- Calories: 450
- Fat: 25g
- Saturated Fat: 3g
- Unsaturated Fat: 20g
- Trans Fat: 0g
- Sodium: 800mg
- Carbohydrates: 35g
- Fiber: 1g
- Sugar: 2g
- Protein: 30g
- Cholesterol: 150mg
This chicken katsu packs a good amount of protein, making it not only delicious but also satisfying! Whether you’re enjoying it as a quick dinner or a special meal, knowing these nutritional details allows you to indulge without worry. Happy cooking!
FAQ Section
Got questions about chicken katsu? Don’t worry, I’ve got you covered! Here are some common queries that pop up when people dive into making this delicious dish:
- Can I make it gluten-free? Absolutely! You can easily swap out the all-purpose flour for a gluten-free flour blend, and use gluten-free panko breadcrumbs. Just make sure to check the labels to ensure everything is certified gluten-free, and you’ll be good to go!
- How do I store leftovers? If you happen to have any chicken katsu left over (which is rare in my house!), let it cool completely before storing it in an airtight container. It’ll last in the fridge for up to 3 days. Just remember to reheat it in the oven to keep that crispy texture intact!
- What variations can I try? Oh, there are so many fun variations! You could try adding different spices to the flour or panko for a flavor twist, like garlic powder or cayenne for a kick. You can also experiment with different sauces; a spicy mayo or sweet chili sauce can be delightful alternatives to the traditional tonkatsu sauce!
- Can I bake the chicken katsu instead of frying it? Yes, you can! Preheat your oven to 400°F (200°C), place the breaded chicken on a baking sheet lined with parchment paper, and spray lightly with cooking oil. Bake for about 20-25 minutes, flipping halfway through. It won’t be quite the same as frying, but it’s a healthier option!
- What sides pair well with chicken katsu? Great question! In addition to the classic steamed rice and shredded cabbage, you can serve it with a fresh salad, miso soup, or even a side of Japanese pickles. Each of these sides adds a delightful contrast to the crispy chicken!
If you have more questions or need further tips, don’t hesitate to reach out! I’m always here to help you make the best chicken katsu possible!
Storage & Reheating Instructions
So, you’ve made this delicious chicken katsu and have some leftovers? No worries, I’ve got the perfect tips to keep it just as tasty for your next meal! Proper storage and reheating are key to maintaining that delightful crunch and juicy chicken.
First off, let your chicken katsu cool completely before storing it. This step is crucial because it prevents condensation from forming in the container, which can make the breading soggy. Once it’s cool, place the chicken in an airtight container. You can also layer parchment paper between the pieces to keep them from sticking together.
Stored this way, your chicken katsu will last in the fridge for up to 3 days. If you want to keep it longer, consider freezing it! Wrap each piece tightly in plastic wrap and then place them in a freezer-safe bag or container. Frozen chicken katsu can stay good for about 2 months.
Now, when it’s time to reheat, you’ll want to bring back that crispy texture. The best method is to use an oven or an air fryer. Preheat your oven to 375°F (190°C) and place the chicken on a baking sheet lined with parchment paper. Bake for about 10-15 minutes, flipping halfway through, until heated through and crispy again. If you’re using an air fryer, set it to 350°F (175°C) and heat for about 5-8 minutes, checking for that perfect crunch.
Avoid using the microwave if you can because it can make the chicken soggy. But if you must, use a microwave crisper pan to help keep some of that crunch. Just remember, reheating properly can make all the difference in enjoying those leftovers!
Print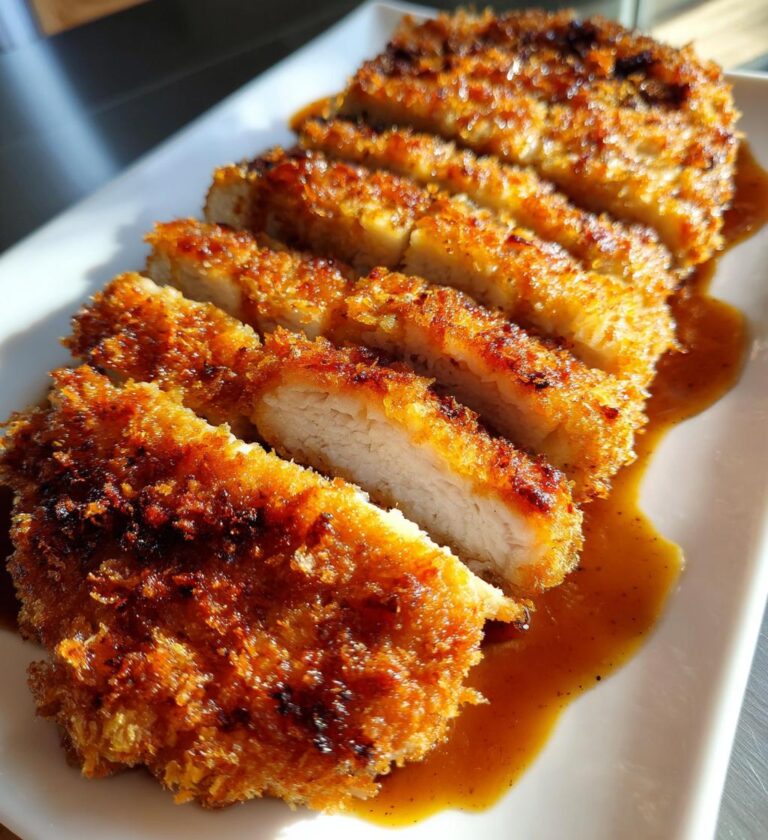
chicken katsu: 7 Irresistible Tips for Perfectly Crispy Bliss
A crispy breaded chicken cutlet served with a savory sauce.
- Total Time: 25 minutes
- Yield: 2 servings 1x
Ingredients
- 2 chicken fillets
- 1 cup panko breadcrumbs
- 1/2 cup all-purpose flour
- 2 eggs
- 1/2 cup vegetable oil
- Salt to taste
- Pepper to taste
- Ton katsu sauce for serving
Instructions
- Pound the chicken fillets to an even thickness.
- Season chicken with salt and pepper.
- Set up a breading station with flour, beaten eggs, and panko breadcrumbs.
- Dredge chicken in flour, dip in eggs, and coat with panko.
- Heat oil in a pan over medium heat.
- Fry chicken until golden brown, about 4-5 minutes per side.
- Drain on paper towels.
- Slice and serve with tonkatsu sauce.
Notes
- Serve with rice and shredded cabbage for a complete meal.
- Adjust frying time based on the thickness of the chicken.
- Prep Time: 15 minutes
- Cook Time: 10 minutes
- Category: Main Dish
- Method: Pan-fry
- Cuisine: Japanese
- Diet: Gluten Free
Nutrition
- Serving Size: 1 piece
- Calories: 450
- Sugar: 2g
- Sodium: 800mg
- Fat: 25g
- Saturated Fat: 3g
- Unsaturated Fat: 20g
- Trans Fat: 0g
- Carbohydrates: 35g
- Fiber: 1g
- Protein: 30g
- Cholesterol: 150mg
Keywords: chicken katsu, breaded chicken, Japanese cuisine