
There’s something absolutely delightful about creating a chicken themed cake that brings smiles and laughter to any gathering! Whether it’s a birthday party or a fun celebration, this cake is a showstopper that sparks joy. I remember the first time I made this chicken themed cake for my niece’s birthday. As soon as I unveiled it, the room erupted with giggles and excitement. Kids were enamored by its colorful design, and adults couldn’t resist snapping photos! It’s such a fun project that allows you to unleash your creativity with frosting and fondant.
Not only is the cake a visual treat, but it’s also incredibly delicious! The fluffy texture combined with the sweet frosting makes every bite a joyful experience. Plus, you can easily customize it for any occasion by changing the colors or decorations. Trust me, once you bake this chicken themed cake, it’ll become a go-to recipe for all your celebrations. It’s all about the fun, creativity, and the laughter that follows, making it a perfect addition to your dessert repertoire!
Ingredients List
To create your delightful chicken themed cake, you’ll need the following ingredients:
- 2 cups all-purpose flour
- 1 1/2 cups sugar
- 1 cup unsalted butter, softened
- 4 large eggs
- 1 cup milk
- 2 1/2 teaspoons baking powder
- 1 teaspoon vanilla extract
- Yellow food coloring (for that cheerful chicken hue)
- White frosting (to give it that fluffy appearance)
- Chocolate chips (for the eyes – they add a fun touch!)
- Red fondant (to create the chicken’s comb)
- Green fondant (for some cute grass detailing)
Gathering these ingredients ahead of time will make your baking experience smooth and enjoyable. Don’t worry if you don’t have fondant; you can always use colored frosting or candy for decoration instead. Now, let’s get ready to bake this fun cake!
How to Prepare a Chicken Themed Cake
Now, let’s dive into the fun part – making your chicken themed cake! Just follow these steps, and you’ll have a delightful cake that’ll wow everyone at your party!
Prepping the Oven and Mixing Dry Ingredients
First things first, you’ll want to preheat your oven to 350°F (175°C). This step is crucial because a properly heated oven ensures your cake rises beautifully! While that’s warming up, grab a large mixing bowl and combine the dry ingredients: the flour, sugar, and baking powder. Give them a good whisk to make sure everything is evenly mixed. This little step is key to avoiding clumps later on.
Creaming Butter and Adding Eggs
In another bowl, it’s time to cream your softened unsalted butter and sugar together. I like to use a hand mixer for this – it makes the job so much easier! Mix until the mixture is light and fluffy; you’re looking for that pale yellow color that’s just perfect. Now, add your eggs one at a time, mixing well after each addition. This helps to incorporate air into your batter, which will make your cake nice and light. If you notice the mixture looking a bit curdled, don’t fret! Just keep mixing until you achieve that smooth consistency.
Combining Ingredients
Now comes the fun part – combining everything! Start by adding about a third of your dry ingredient mixture to the butter and sugar, followed by half of the milk. Mix gently until just combined. Repeat this process, alternating between dry and wet ingredients, until everything is in the bowl. Finally, stir in your vanilla extract and yellow food coloring. This is when your batter starts to look like a cheerful chicken! Make sure to scrape down the sides of the bowl to get every bit mixed in.
Baking the Cake
Once your batter is smooth and well combined, it’s time to pour it into your greased cake pans. I usually divide it evenly between two pans for that classic layered look. Slide them into your preheated oven and bake for 30-35 minutes. I recommend setting a timer! To check if they’re done, stick a toothpick in the center – if it comes out clean, you’re all set. If it has wet batter clinging to it, give it a few more minutes.
Cooling and Decorating
After you’ve pulled those beautiful cakes out of the oven, let them cool in the pans for about 10 minutes before transferring them to a wire rack. It’s important to let them cool completely because decorating a warm cake can lead to a melty mess! Once cooled, it’s time to frost with your white frosting. Get creative with your decorations using chocolate chips for eyes and fondant for the comb and grass. Trust me, this is where the cake really comes to life! Have fun with it, and let your imagination run wild!
Why You’ll Love This Chicken Themed Cake
- Fun Design: The playful chicken shape brings joy and laughter to any party, making it a hit with kids and adults alike!
- Easy Preparation: With simple steps and easily accessible ingredients, you don’t need to be a baking pro to create this adorable cake.
- Customizable: You can switch up the colors and decorations to match any theme or occasion, from birthdays to baby showers.
- Delicious Flavor: This cake boasts a fluffy texture and sweet frosting, ensuring that it tastes as good as it looks!
- Great for Sharing: Perfectly sized to serve up to 12 people, it’s ideal for gatherings, parties, or just a fun family dessert night.
Tips for Success
To ensure your chicken themed cake turns out perfectly every time, here are some handy tips that I swear by:
- Leveling the Cakes: Once your cakes have cooled, use a serrated knife to trim the tops for an even surface. This simple step makes stacking and decorating much easier – plus, you’ll have those lovely, even layers!
- Right Tools for Decoration: Invest in a good offset spatula for frosting; it helps spread the icing smoothly and makes your cake look professional. A small round cutter is great for shaping fondant details, too!
- Cool Completely: Make sure your cakes are completely cool before you start frosting. If they’re even a little warm, the frosting can melt and slide off – trust me, I’ve learned this the hard way!
- Use a Turntable: If you have a cake turntable, use it! It makes decorating so much easier and gives you a nice, even finish.
With these tips, you’ll be on your way to creating an amazing chicken themed cake that’s as perfect as it is cute!
Nutritional Information
As with any recipe, the nutritional values for this chicken themed cake can vary based on the specific ingredients and brands you use. However, here’s a general breakdown of the typical nutritional information per slice (1 slice):
- Calories: 350
- Fat: 15g
- Saturated Fat: 8g
- Trans Fat: 0g
- Cholesterol: 80mg
- Sodium: 150mg
- Carbohydrates: 50g
- Fiber: 1g
- Sugar: 30g
- Protein: 4g
These figures provide a good idea of what to expect, but don’t hesitate to adjust ingredients to suit your dietary needs!
FAQ Section
Here are some common questions I get about making this delightful chicken themed cake. Hopefully, these answers will help you create your own masterpiece!
- What can I use instead of fondant for decorations? No worries if you’re not a fondant fan! You can easily use colored frosting or even candies like gummy worms for decoration. Just get creative with what you have on hand!
- Can I store the cake after it’s decorated? Absolutely! Once your chicken themed cake is decorated, store it in an airtight container at room temperature for up to three days. If you need to keep it longer, you can refrigerate it, but be aware that the frosting might harden a bit.
- What flavors can I use for the cake? While the classic vanilla flavor is delightful, feel free to experiment! Chocolate or lemon cake batter would work wonderfully too. Just adjust the frosting to match the flavor you choose.
- How can I make this cake gluten-free? You can swap the all-purpose flour for a gluten-free blend that measures 1:1. This makes it easy to enjoy the fun without gluten!
- How do I prevent the cake from sticking to the pans? Make sure to grease your pans well and consider using parchment paper for extra insurance. It’s a lifesaver for easy removal!
If you have more questions or need specific advice, feel free to reach out in the comments! I love helping fellow bakers create their own chicken themed cake magic!
Storage & Reheating Instructions
To keep your chicken themed cake fresh and delicious, store any leftovers in an airtight container at room temperature for up to three days. If you want to keep it longer, refrigerating it is a good option, but be aware that the frosting might firm up a bit. Just make sure it’s well-covered to avoid any drying out!
If you need to reheat a slice, I recommend using the microwave. Warm it up for about 10-15 seconds – just enough to take the chill off without melting the frosting. You can also enjoy it cold, as the flavors really shine through! Trust me, whether it’s fresh or reheated, this cake is sure to bring a smile to your face every time!
Share Your Experience
I’d love to hear about your adventures with the chicken themed cake! Did you try any fun decorations or flavors? Maybe you made it for a special occasion? Please leave a comment below to share your thoughts, tips, or any creative twists you added to the recipe. If you enjoyed making it, a quick rating would mean the world to me! Let’s inspire each other to keep the baking fun alive!
Print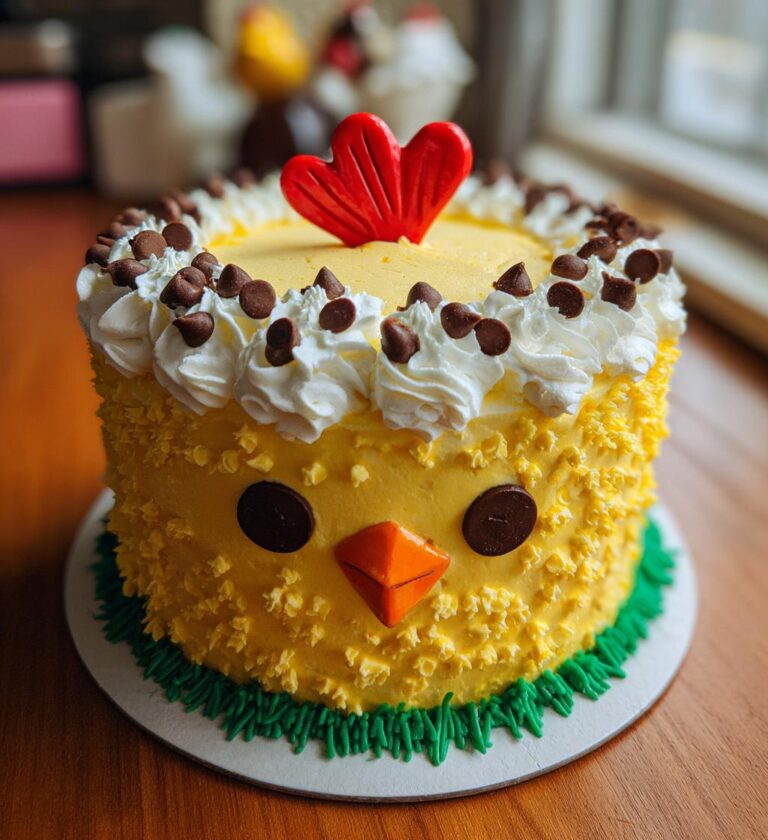
Chicken Themed Cake: 5 Reasons to Delight Your Guests
A fun and creative chicken themed cake perfect for parties.
- Total Time: 1 hour 5 minutes
- Yield: 12 servings 1x
Ingredients
- 2 cups all-purpose flour
- 1 1/2 cups sugar
- 1 cup unsalted butter, softened
- 4 large eggs
- 1 cup milk
- 2 1/2 tsp baking powder
- 1 tsp vanilla extract
- Yellow food coloring
- White frosting
- Chocolate chips for eyes
- Red fondant for comb
- Green fondant for grass
Instructions
- Preheat your oven to 350°F (175°C).
- In a bowl, mix flour, sugar, and baking powder.
- In another bowl, cream the butter and sugar until fluffy.
- Add eggs one at a time, mixing well after each.
- Alternate adding dry ingredients and milk to the butter mixture.
- Add vanilla extract and yellow food coloring.
- Pour batter into greased cake pans.
- Bake for 30-35 minutes or until a toothpick comes out clean.
- Let cakes cool completely.
- Frost with white frosting and decorate with chocolate chips and fondant.
Notes
- You can use any cake flavor you prefer.
- Make sure the cake is completely cool before decorating.
- Use a serrated knife to level the cakes for even stacking.
- Prep Time: 30 minutes
- Cook Time: 35 minutes
- Category: Dessert
- Method: Baking
- Cuisine: American
- Diet: Vegetarian
Nutrition
- Serving Size: 1 slice
- Calories: 350
- Sugar: 30g
- Sodium: 150mg
- Fat: 15g
- Saturated Fat: 8g
- Unsaturated Fat: 5g
- Trans Fat: 0g
- Carbohydrates: 50g
- Fiber: 1g
- Protein: 4g
- Cholesterol: 80mg
Keywords: chicken themed cake, birthday cake, fun cake