
Let me tell you about my absolute favorite comfort food: Japanese Karaage Fried Chicken! This dish is a flavor bomb wrapped up in a crispy, golden shell that’s simply irresistible. The first time I tasted it was at a little hole-in-the-wall izakaya in Tokyo, and wow, I was hooked! The chicken was marinated to perfection, then fried until it reached this delightful balance of crunchy on the outside and juicy on the inside. It was love at first bite, and I still remember that satisfying crunch as I bit into the tender chicken. Ever since then, I’ve been on a mission to recreate that magic in my own kitchen. The secret lies in the marinade, which infuses the chicken with umami goodness from soy sauce and a kick of ginger and garlic. Trust me, once you try making Japanese Karaage Fried Chicken at home, you won’t want to go back to takeout. It’s perfect for a cozy night in or impressing friends at a dinner party!
Ingredients List
- 500g boneless chicken thigh, cut into bite-sized pieces
- 2 tablespoons soy sauce
- 1 tablespoon sake
- 1 tablespoon grated ginger
- 2 cloves garlic, minced
- 1 cup potato starch, for an extra crispy coating
- Oil for frying, enough to submerge the chicken
How to Prepare Japanese Karaage Fried Chicken
Now, let’s dive into the fun part – preparing this delicious Japanese Karaage Fried Chicken! Follow these steps, and you’ll be well on your way to impressing yourself and anyone lucky enough to share this meal with you.
Step 1: Prepare the Chicken
First things first, grab your 500g of boneless chicken thighs and cut them into bite-sized pieces. I like to aim for about 2-inch chunks; this way, they cook evenly and are easy to pop in your mouth. Make sure to remove any excess fat or gristle for that perfect bite! A sharp knife is your best friend here, and don’t rush it—uniform pieces mean consistent cooking, and trust me, you want that golden crunch on every piece!
Step 2: Make the Marinade
Next up, it’s time to whip up that magical marinade! In a mixing bowl, combine 2 tablespoons of soy sauce, 1 tablespoon of sake, 1 tablespoon of grated ginger, and 2 cloves of minced garlic. The aroma will knock your socks off! Give it a good stir until everything is well-blended. This marinade is what infuses your chicken with layers of flavor. Don’t skip this step—marinating is crucial for that tender, juicy goodness!
Step 3: Marinate the Chicken
Now, toss those chicken pieces into the marinade, ensuring each piece is well-coated. Cover the bowl with plastic wrap and let it marinate for at least 30 minutes. If you have the time, though, I highly recommend marinating it overnight in the fridge. This extra time allows the flavors to penetrate deeply, making each bite even more delicious. Just remember to take it out of the fridge about 15 minutes before frying to bring it to room temperature.
Step 4: Coat with Potato Starch
Once your chicken has marinated to perfection, it’s time to coat it in potato starch! This is the secret to that irresistible crunch. Grab a plate and pour about 1 cup of potato starch onto it. Working in batches, take each piece of chicken and coat it evenly with the starch, shaking off any excess. The more evenly coated, the better! The potato starch will create that crispy exterior you’re dreaming about.
Step 5: Heat the Oil
Now it’s time to heat up your oil! Pour enough oil into a deep pan to submerge the chicken—about 2 inches deep should do the trick. Heat the oil over medium heat until it reaches around 170°C (340°F). A quick tip: if you don’t have a thermometer, you can test the oil by dropping in a small piece of bread. If it sizzles and turns golden brown within about 30 seconds, you’re good to go!
Step 6: Fry the Chicken
Carefully add the coated chicken pieces to the hot oil in batches, making sure not to overcrowd the pan. Fry them for about 5-7 minutes, turning occasionally, until they’re beautifully golden brown and cooked through. You’ll know they’re done when they reach an internal temperature of 75°C (165°F). Pro tip: keep an eye on your oil temperature; if it gets too hot, the chicken will burn on the outside and remain raw on the inside!
Step 7: Drain and Serve
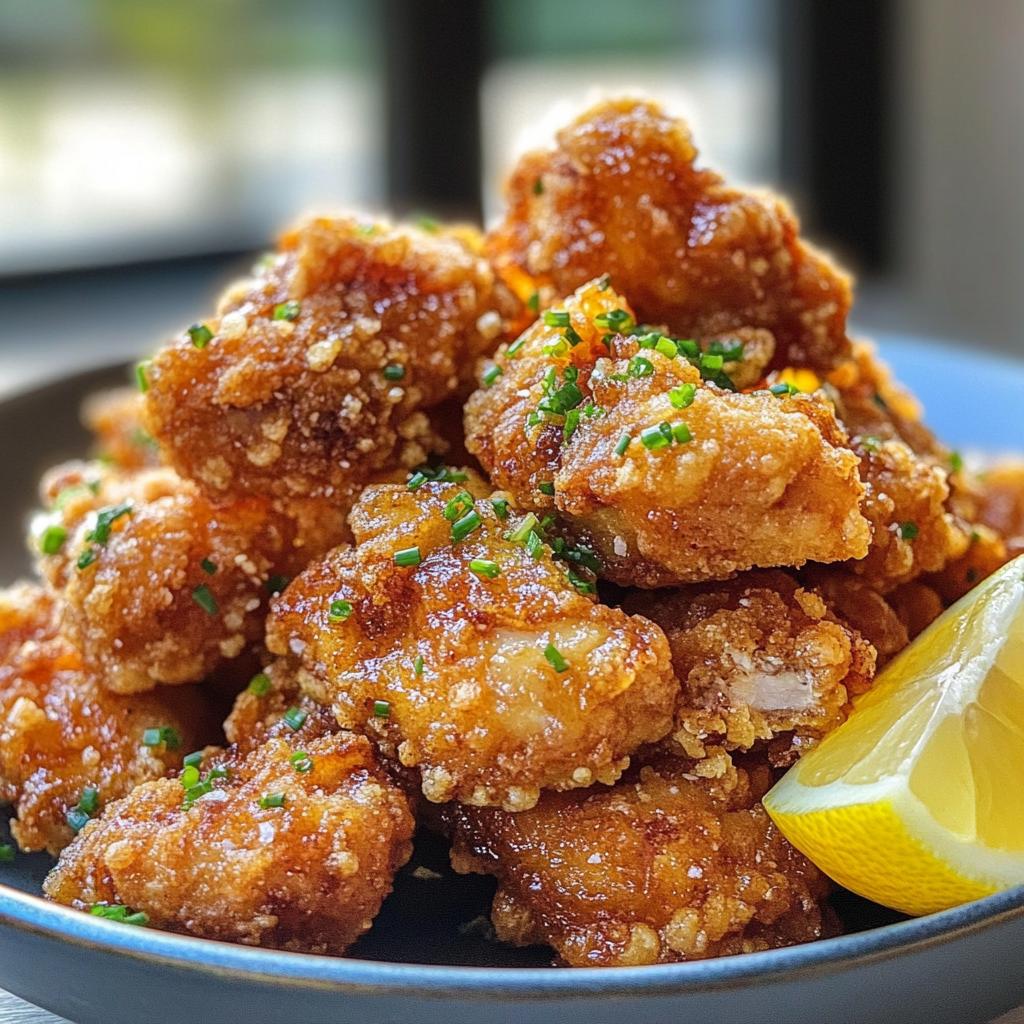
Once fried to perfection, remove the chicken from the oil and let it drain on paper towels to soak up any excess oil. Serve your hot, crispy Japanese Karaage Fried Chicken with lemon wedges on the side. The citrus adds a lovely brightness that complements the richness of the chicken. Trust me, you’re going to want to savor every bite!
Tips for Success
Want to elevate your Japanese Karaage Fried Chicken to legendary status? Here are some tried-and-true tips that’ll help you nail it every single time!
Marinate for Maximum Flavor
If you can, give your chicken a longer marinating time—overnight is ideal! This allows the flavors to really sink in, making the chicken extra juicy and flavorful. Just make sure to bring it to room temperature before frying; this helps with even cooking and that flawless crunch!
Use Fresh Ingredients
Fresh garlic and ginger make a world of difference in flavor. I always opt for freshly grated ginger over the powdered stuff. It’s worth the extra effort! You’ll notice that zing in your chicken that just can’t be replicated with dried spices.
Mind the Oil Temperature
Keeping an eye on your oil temperature is crucial! Too hot, and the outside burns while the inside stays raw; too cool, and your chicken will soak up excess oil and become greasy. A steady 170°C (340°F) is your sweet spot. If you don’t have a thermometer, the bread test I mentioned earlier works wonders!
Fry in Batches
Don’t overcrowd the pan; it’s tempting, but trust me, it’ll lead to soggy chicken. Fry in small batches to maintain that perfect crispy texture. Plus, you’ll have better control over the cooking process.
Let It Rest
After frying, let your chicken rest on paper towels for a couple of minutes. This not only helps it drain any excess oil but also lets the juices redistribute, ensuring every bite is succulent!
Experiment with Dips
While lemon wedges are classic, don’t shy away from trying different dipping sauces! A tangy soy sauce or a spicy mayo can add an exciting twist to your meal. Just think of it as adding extra layers of flavor!
By following these tips, you’ll serve up perfectly crispy, incredibly flavorful Japanese Karaage Fried Chicken that’ll impress anyone lucky enough to share your table. Happy frying!
Why You’ll Love This Recipe
- Quick Preparation: With just 30 minutes of marinating time and 15 minutes of frying, you can whip up a delicious meal in under an hour!
- Flavor Explosion: The combination of soy sauce, ginger, and garlic creates a rich umami flavor that makes each bite unforgettable.
- Crispy Texture: The potato starch coating ensures a perfectly crunchy exterior that contrasts beautifully with the juicy chicken inside.
- Versatile Dish: Serve it as a main dish, a party appetizer, or a finger food at gatherings—it’s a crowd-pleaser for any occasion!
- Customizable: Experiment with different dipping sauces or serve it with a fresh salad for a personalized touch.
- Gluten-Free Option: Made with potato starch instead of flour, this recipe is a fantastic gluten-free choice that everyone can enjoy!
Nutritional Information Section
When it comes to enjoying Japanese Karaage Fried Chicken, it’s nice to know what you’re putting on your plate! Here’s an estimated breakdown of the nutritional values per 100g serving:
- Calories: 250
- Fat: 15g
- Saturated Fat: 3g
- Unsaturated Fat: 10g
- Trans Fat: 0g
- Cholesterol: 70mg
- Sodium: 600mg
- Carbohydrates: 10g
- Fiber: 1g
- Sugar: 1g
- Protein: 20g
These values are estimates, of course, and can vary based on how you prepare your chicken and the specific ingredients you use. But with such a tasty dish, you’ll find it’s well worth every bite! Enjoy your delicious Karaage guilt-free, knowing it’s packed with protein and flavor!
FAQ Section
If you’re curious about Japanese Karaage Fried Chicken, you’re not alone! Here are some common questions I get, along with my answers, to help you master this delicious dish.
Can I use chicken breast instead of thighs?
Absolutely! While I prefer boneless chicken thighs for their juicy flavor, chicken breast works too. Just keep in mind that breast meat can dry out more easily, so be careful not to overcook it. Marinating is just as important here to keep it tender and flavorful!
What can I substitute for sake in the marinade?
If you don’t have sake on hand, you can use dry white wine or even a splash of rice vinegar mixed with water. The goal is to add a bit of acidity to the marinade, so whatever gives you a similar effect will work just fine!
How long can I store leftovers?
Leftover Japanese Karaage Fried Chicken can be stored in an airtight container in the fridge for up to 3 days. Just make sure it’s completely cooled before sealing it up. To reheat, pop it in the oven or an air fryer to regain that crispy texture. Avoid microwaving if you can; it tends to make the chicken soggy!
Can I freeze Karaage for later?
You sure can! After frying, let the chicken cool completely, then place it in a single layer on a baking sheet to freeze. Once frozen, transfer the pieces to a freezer bag. When you’re ready to enjoy, you can reheat them straight from the freezer in an oven or air fryer until heated through and crispy!
Can I make this recipe gluten-free?
Yes, indeed! This recipe already uses potato starch, which is gluten-free. Just double-check that your soy sauce is gluten-free as well, or opt for tamari instead. You’ll still get that delicious crunch and flavor without the gluten!
What sides go well with Karaage?
Great question! Japanese Karaage Fried Chicken pairs beautifully with a fresh salad, steamed rice, or even some pickled vegetables for a nice crunch. You can also serve it with a dipping sauce—like a spicy mayo or a tangy ponzu—for an extra flavor kick!
Hopefully, these FAQs help clear up any questions you might have about making your own Japanese Karaage Fried Chicken. Enjoy the process and happy frying!
Serving Suggestions
Now that you’ve mastered the art of making Japanese Karaage Fried Chicken, let’s talk about what to serve alongside it to create a delightful and complete meal! The beauty of this dish is its versatility, allowing you to pair it with a variety of sides that complement its rich flavors and crispy texture.
Steamed Rice
You can’t go wrong with a bed of fluffy steamed rice! The simplicity of white or brown rice lets the flavor of the Karaage shine. Plus, it’s perfect for soaking up any juices or dipping sauces. If you want to jazz it up a bit, consider adding a sprinkle of sesame seeds or chopped green onions on top!
Fresh Salad
A crisp salad is a refreshing contrast to the rich, savory Karaage. I love a simple mixed green salad with a light sesame dressing or a tangy vinaigrette. Toss in some shredded carrots and sliced cucumbers for extra crunch and color. It not only looks beautiful but adds a nice balance to your meal!
Pickled Vegetables
For a true Japanese touch, serve some pickled vegetables on the side. Quick pickles like pickled daikon or cucumbers provide a tangy crunch that complements the chicken perfectly. You can easily make quick pickles at home with vinegar, sugar, and a dash of salt!
Japanese Coleslaw
Another fantastic option is a Japanese-style coleslaw made with shredded cabbage, carrots, and a creamy miso or sesame dressing. It’s light, crunchy, and adds a delightful twist to your meal that pairs beautifully with the Karaage’s flavors.
Dipping Sauce
Don’t forget about dipping sauces! A simple soy sauce or ponzu sauce works wonders, but you can also whip up a spicy mayo by combining mayonnaise with sriracha or chili paste. This adds an exciting kick that your guests will love!
Beer or Green Tea
Finally, consider your beverage choices! A cold Japanese beer, like Asahi or Sapporo, pairs perfectly with the fried chicken, enhancing the meal’s overall experience. If you’re looking for a non-alcoholic option, a refreshing glass of cold green tea is a fantastic choice that complements the flavors beautifully.
With these serving suggestions, you’ll create a delightful and satisfying meal centered around your delicious Japanese Karaage Fried Chicken. Enjoy every bite and the happy faces around your table!
Print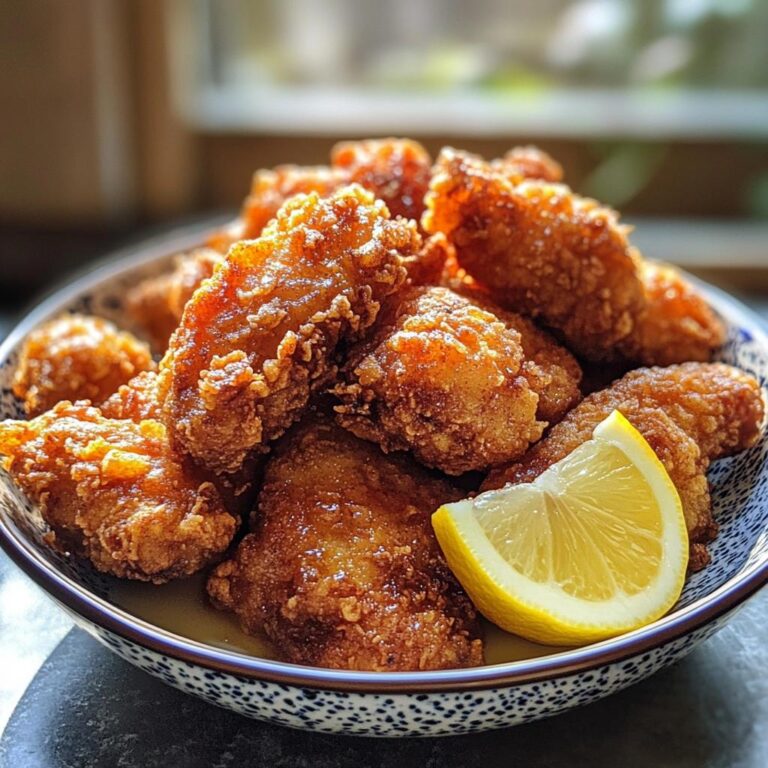
Japanese Karaage Fried Chicken: 7 Steps to Crunchy Bliss
Japanese Karaage Fried Chicken is a flavorful and crispy dish that features marinated chicken pieces, fried to perfection.
- Total Time: 45 minutes
- Yield: 4 servings 1x
Ingredients
- 500g chicken thigh, boneless
- 2 tablespoons soy sauce
- 1 tablespoon sake
- 1 tablespoon grated ginger
- 2 cloves garlic, minced
- 1 cup potato starch
- Oil for frying
Instructions
- Cut the chicken into bite-sized pieces.
- In a bowl, mix soy sauce, sake, ginger, and garlic.
- Add chicken to the marinade and let it sit for at least 30 minutes.
- Coat the marinated chicken in potato starch.
- Heat oil in a deep pan over medium heat.
- Fry the chicken in batches until golden brown and cooked through, about 5-7 minutes.
- Remove and drain on paper towels.
- Serve hot with lemon wedges.
Notes
- For extra flavor, marinate the chicken overnight.
- Adjust the frying time based on the size of chicken pieces.
- Serve with dipping sauce for added taste.
- Prep Time: 30 minutes
- Cook Time: 15 minutes
- Category: Main Dish
- Method: Frying
- Cuisine: Japanese
- Diet: Gluten Free
Nutrition
- Serving Size: 100g
- Calories: 250
- Sugar: 1g
- Sodium: 600mg
- Fat: 15g
- Saturated Fat: 3g
- Unsaturated Fat: 10g
- Trans Fat: 0g
- Carbohydrates: 10g
- Fiber: 1g
- Protein: 20g
- Cholesterol: 70mg
Keywords: Japanese Karaage Fried Chicken, Fried Chicken, Japanese Cuisine, Karaage